I Heart You

Hi there!

I’m sharing a Valentine’s Day card today….

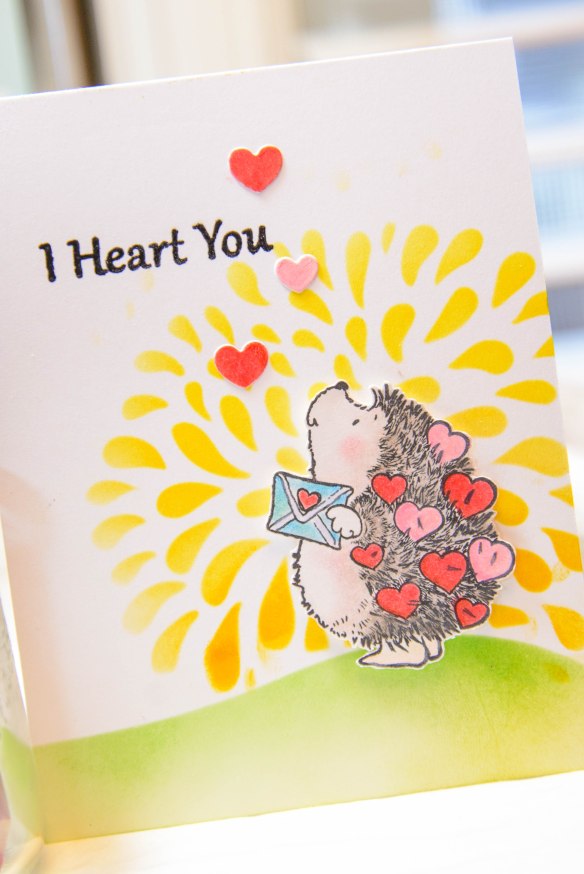
SUPPLIES: Stamps: So Loved (30-457); I Heart You (30-272) Stencil: Patina (25-018) Dies: Hearts in Circle (51-095) Color: Prismacolor Pencils; Distress Ink (Ranger); Black Hybrid Ink; Black Onyx Versafine (Tsukineko) Other: Clear Embossing Powder (Ranger); Glitter Pen (Spectrum Noir)

As you may know, I LOVE the images Margaret Sherry creates for Penny Black.  So, of course I couldn’t help but stamp one of her more iconic images, the hedgehog.

I created a Valentines card using the latest set, So Loved (30-457).  I stamped and fussy cut this hedgehog image coloring him with Prismacolor pencils.

I cut out a hill stencil from scrap paper and used the negative image to color the hill with green Distress Inks.  I covered the hill with my stencil and used the Patina (25-018) stencil to create a sunburst using yellow Distress Inks.

To finish out the card, I die cut several hearts using the Hearts Circle (51-095) Die.  I colored each heart with Prismacolor Pencils.  I also added clear glitter on each heart as well as the hearts on the hedgehog.  The hedgehog was adhered with foam tape.  Finally, a sentiment from I Heart You (30-272) clear set was stamped and clear embossed to complete the card.

Until Next time!


Smiles and Hugs

Happy New Year!

I’m ending the year with a whimsical and bright card.

SUPPLIES Stamps: Woodland Friends (30-278), Banner Sentiments (30-423) Dies: Triple Banner (51-027) Color: Copic Markers; Tumbled Glass Distress Ink (Ranger); Black Licorice Hybrid Ink Other: Glossy Accents (Ranger); Versamark Ink (Tsukineko); White Embossing Powder; Shimmer Pen (Spectrum Noir)

On white cardstock, I stamped the bunny image from the clear set, Woodland Friends (30-278).  I colored the bunnies with Copic markers and fussy cut the images.

On my card panel, I stamped the bunny image again at the top center.  I then colored the entire panel with Tumbled Glass Distress Ink using a round sponge applicator.  After, I colored the stamped image with Copic markers.  I added the cut out images over the bunny images and adhered them with foam tap.  I added a little shimmer to the bunnies’ ears and added Glossy Accents to the hearts.

I then worked on my sentiment.  Using black cardstock I cut out a banner from the Triple Banner (51-027) die set.  I stamped a sentiment from Banner Sentiments using Versamark ink and White EP.  The banner was adhered with foam tape at the bottom of the stamped image on my panel.

Finally, I added the panel to a yellow cardstock card base using foam tape.

And here’s a sneak peak of my card posted on the Simplicity Sister blog.  You can find the post here.

Until next year!

Christmas Greetings

Hi there!

Thanksgiving is close at hand and I’m starting to gather all my ingredients for our dinner feast.


I’m sharing today’s Christmas card using Penny Black products.

SUPPLIES Stamps: Christmas Circle (4343K); Festive Snippets (30-387) Dies: Whirl Wreath (51-151) Color: Green Hybrid Ink; Versafine Black Onyx Ink (Tsukineko); Brilliance Galaxy Gold (Tsukineko) Other: Clear Embossing Powder (Ranger); Glossy Accents (Ranger); Clear Sparkle Pen (Spectrum Noir); Tim Holtz Stamp Platform (Tonic Studios); Patterned Kraft Fold Paper

I made a very simple card this time.

On my card panel, using my stamp positioning tool, I partially stamped several times with green ink, the simple yet elegant Christmas Circle (4343K).  I then stamped and embossed a greeting from the clear set Festive Snippets (30-387) on the bottom corner of the panel.

Using red cardstock, I die cut several time the bow from the die set Whirl Wreath (51-151).  I then adhered them all together.  I added glitter using my sparkle pen as well as some shine using Glossy Accents.  Once it was dry, I adhered it on the wreath image on the card panel.

To add a little elegance to this card, I added foil pressed kraft paper to my card base.  I then adhered my panel to complete the card.

Hope you all have a wonderful week and a wonderful holiday!


Peace on Earth

Hello!

Here’s a clean and simple card.  I very rarely use colored cardstock (simply because I forget I have it) and wanted to create something easy.

For this card, I used a previously released Lawn Fawn set, Let It Snow.  I stamped my scene with Versamark Ink and heat embossed with white EP.  The sentiment is from Neat & Tangled’s Bible Journaling and Christmas Journaling.  The “and” is from Concord & 9th’s Perfectly Penned.  For the snow and stars, I stamped with Versamagic Cloud White.  Once I completed my card panel, I adhered it with foam tape to a kraft base.

Simple.

Check out the Penny Black Simplicity Blog.   It’s my turn this week to share a Penny Black stamp creation.  You can check out the post here.


…through the Snow

Hi there!

Here’s a simple and cute card.

I stamped this image from Avery Elle’s Dashing clear set a year ago.  By the time I finished watercoloring and die cutting the image, the holidays were over.  And to be honest, I wasn’t up to making another holiday card.  I set it aside in my little bowl of “images to be used later” (creative, huh?).  So finally last month I decided to use it.

To create my background, I adhered blue striped patterned paper onto my card base.  I then die cut my snowy bank using Simon Says Stamp Stitched Slopes and Hills.  I trimmed and adhered it over my patterned paper background.  I stamped and embossed a sentiment on the top corner of the based.  I then adhered my car/tree image using dimensional foam tape.  Finally I added sequined stars to complete the scene.

More to come!


Be Joyful

Hello!

Continuing my Christmas card creations.  Today, I’m sharing a card using several products form Hero Arts, Memory Box and Simon Says Stamp.

To begin, I decided to use a background stamp on a kraft paper card panel.  I dug into my older set of stamps and decided to use this Basic Grey/Hero Arts background stamp, Stitched Greetings.  I stamped with Versamark ink and heat embossed with clear embossing powder.

On white cardstock, I stamped the wreath image from Memory Box’s Christmas Botanicals with black ink.  I watercolored and fussy cut the image.

Finally, I stamped the sentiment from Simon Says Stamps Big Scripty Greetings on a strip of black cardstock.

I assembled the card adhering the wreath with dimensional foam towards the top of my panel.  I adhered the panel to a white cardstock base.  I then added my sentiment and added iridescent sequins to finish it.

I have a quite a few more Christmas cards to share so stay tuned!


A Merry Little Christmas

Hi there!

Today I’m sharing a simple Christmas card.

For this card, I created a background on my card base using the smaller images from a Christmas stamp set, MFT’s Birdie Brown’s Santa’s Elves.  With the help of a T-square ruler, I stamped each image with black ink.  I just used 3 colors for the images and then simply added a sentiment on a die cut frame.  The sentiment is from a old Christmas set, Jingle All the Way, designed by Ali Edwards for Technique Tuesday.  It was stamped and heat embossed with white EP.  I added clear sequins to finish off the card.

Until next time!


Love, Joy & Peace


Hello!

I’m sharing a Christmas card courtesy of Penny Black.

SUPPLIES Stamps: Love at Xmas (30-187); Believe (30-310) Color: Inktense Color Pencils (Derwent); Tumbled Glass Distress Ink (Ranger); Versafine Black Onyx Ink (Tsukineko); Black Hybrid Ink Other: Clear Embossing Powder (Ranger); White Liquid Applique Pen (Marvy Uchida)

I love these Mo Manning images from the old set, Love at Xmas.  They are so endearing.   I stamped the mailbox girl with black ink and watercolored the image with Derwent Inktense Colored Pencils.  I masked off the image and then added Tumbled Glass Distress Ink.  I then added drops of White Liquid Applique to mimic snow.  I stamped and embossed the sentiment from Believe (30-310).  Finally I added my panel to a card base with foam adhesive.

That’s it for this evening!


Joyful Tidings

Hello!

Today I’m sharing the last of my cards using Hero Arts clear set Holly Days.  The images may not be the focal point of my cards but they certainly add a dramatic touch.

I thought I’d add a little gold to the last of my cards.  Using gold Delicata ink, I stamped the 2 pinecones in the set interchanging each image on my card base.  On a black card stock oval die cut,  I stamped and embossed with white embossing powder a sentiment from Hero Arts Under the Mistletoe.  The die cut oval was adhered to the card base with foam tape.  I then added a watercolored berry image from Holly Days above the oval.  Finally, I added a few clear sequins for interest.

I’ve got a number of Christmas cards to share in the following weeks.  Until then.


Peace & Love

Hello!

I’m sharing a more classical style of Christmas card.  Again, I’ve been highlighting the images from the Hero Arts clear set, Holly Days.

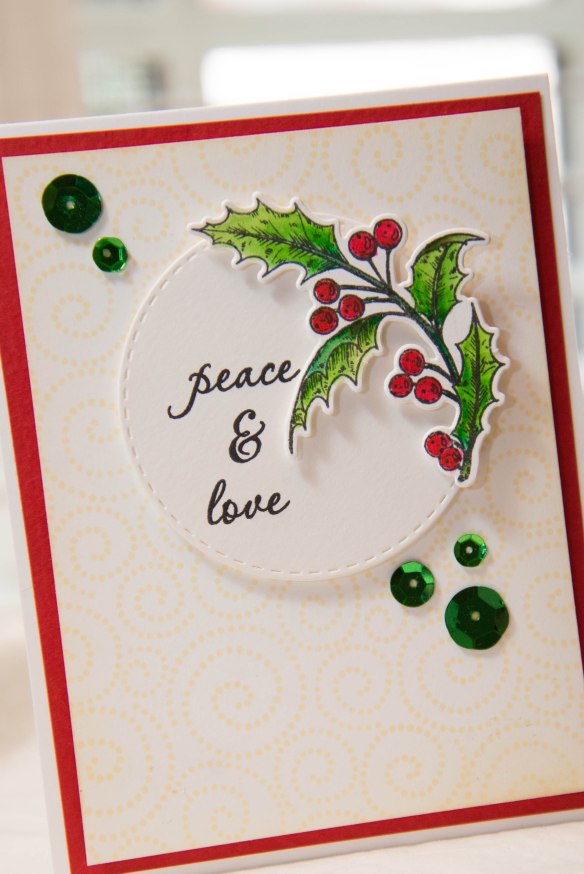
I decided to pull out a old (and I believe retired) Hero Arts cling – Magical Background.  I stamped the image on my card panel.  On a stitched die cut circle, I stamped a sentiment from Holly Days and adhered a watercolored image of a holly branch.  I added red cardstock to fit the card base and then attached my card panel.  Finally, I added green sequins to finish the card.

Until tomorrow.