…through the Snow

Hi there!

Here’s a simple and cute card.

I stamped this image from Avery Elle’s Dashing clear set a year ago.  By the time I finished watercoloring and die cutting the image, the holidays were over.  And to be honest, I wasn’t up to making another holiday card.  I set it aside in my little bowl of “images to be used later” (creative, huh?).  So finally last month I decided to use it.

To create my background, I adhered blue striped patterned paper onto my card base.  I then die cut my snowy bank using Simon Says Stamp Stitched Slopes and Hills.  I trimmed and adhered it over my patterned paper background.  I stamped and embossed a sentiment on the top corner of the based.  I then adhered my car/tree image using dimensional foam tape.  Finally I added sequined stars to complete the scene.

More to come!


Be Joyful

Hello!

Continuing my Christmas card creations.  Today, I’m sharing a card using several products form Hero Arts, Memory Box and Simon Says Stamp.

To begin, I decided to use a background stamp on a kraft paper card panel.  I dug into my older set of stamps and decided to use this Basic Grey/Hero Arts background stamp, Stitched Greetings.  I stamped with Versamark ink and heat embossed with clear embossing powder.

On white cardstock, I stamped the wreath image from Memory Box’s Christmas Botanicals with black ink.  I watercolored and fussy cut the image.

Finally, I stamped the sentiment from Simon Says Stamps Big Scripty Greetings on a strip of black cardstock.

I assembled the card adhering the wreath with dimensional foam towards the top of my panel.  I adhered the panel to a white cardstock base.  I then added my sentiment and added iridescent sequins to finish it.

I have a quite a few more Christmas cards to share so stay tuned!


Find Joy Every Day

Hello!

Hope everyone is having a great weekend.

I sent a birthday present (a framed family portrait) to my mother-in-law recently.  Of course I included a hand made card using MFT’s Birdie Brown creations.  I love her adorable stamps!

SUPPLIES Stamps: Adorable Elephants (MFT) Dies: Scallop Stitches Wafer (SSS) Color: Clean Color Watercolor Brush Markers (Kuretake), Black Licorice Hybrid Ink (MFT), Distress Ink (Ranger)

To create this card, I colored one of the cute little elephants with watercolor markers and then fussy cuts.  I die cut the “grass” mound from cardstock using SSS’s Scallop Stitches Wafer set.  The paper was then colored with Mowed Lawn Distress Ink.  The card panel was lightly colored with Tumbled Glass Distress Ink.  I stamped and colored several butterflies on my card panel.  The mound was adhered to the panel followed by the cute little elephant.  The sentiment is from Hero Arts.  Finally, I mounted the panel to my card base using foam tape.

Until next time.


Love & Laughter

Hi there!

I’ve been admiring stamps from The Ton and I wanted to play around with a few that I borrowed from my dear friend Vera.  Here’s what I made…

untitled-1080-2 untitled-1066-2

Love these roses from the Fresh Cut Garden Roses set!  I simply smooched water downed Distress Ink to these images.  I purposely left them unfinished to keep it interesting.

For the rest of the card, I added texture to the panel using one of my favorite Papertrey Ink impression plates, Linen & Canvas.  In addition, I splattered white and black watercolor ink on the panel.  I cut a circle in the panel and added a sentiment courtesy of Penny Black to the card base.

Hope you all are enjoying the day.

My Heart

Hey there!

I have another card to share this Valentine’s Day.

untitled-6564-3

SUPPLIES:  Stamp:  Hog Heaven (MFT) Dies:  Flat Bottom Clouds (SSS); Mini Hearts Set (SSS); Stitched Rectangles (SSS) Color:  Clean Color Watercolor Brush Markers (Kuretake); Black Licorice Hybrid (MFT); Red Copic Markers Other: Sparkle Pen (Spectrum Noir)

SUPPLIES: Stamp: Hog Heaven (MFT) Dies: Flat Bottom Clouds (SSS); Mini Hearts Set (SSS); Stitched Rectangles (SSS) Color: Clean Color Watercolor Brush Markers (Kuretake); Black Licorice Hybrid (MFT); Red Copic Markers Other: Sparkle Pen (Spectrum Noir)

My husband and I really don’t make a deal on Valentine’s Day.  A box of chocolate would be nice but it’s not really necessary.  In any case, I try to make a card for him every year – just to start the day on a bright note.  I like to “surprise” him by placing the card the night before on his side of the closet so he can find something happy to open.

I love these little pigs from My Favorite Things – especially this cute little winged one.  I had to include it in a card flying over a few cards.  It was a hit and he loved it (despite it being cutesy).

Hope you all have a good day!

p.s.  I’m adding this to SSS Wednesday challenge (just made it on time).


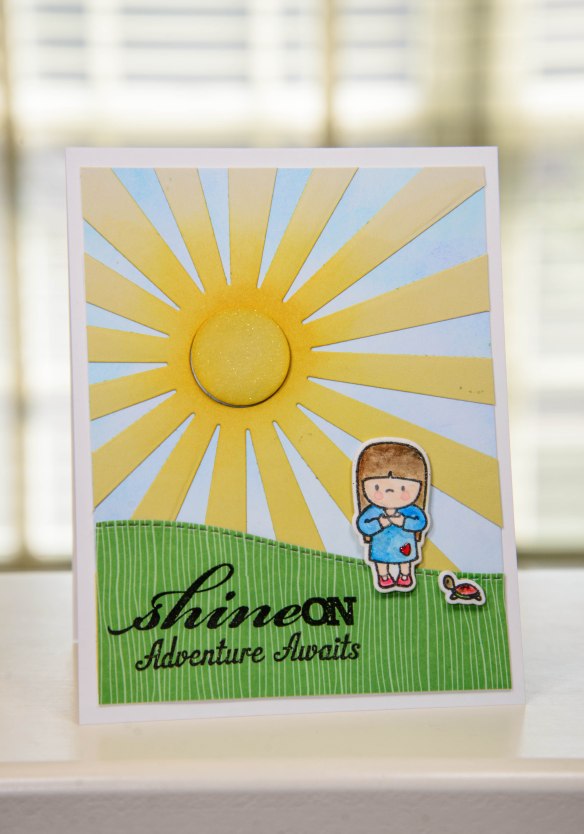
Shine On

Hello!

Hope you all are off to a great weekend!

Every year I make a card for my daughter at the start of school.  It’s her last year of Middle School (yikes!) and I wanted to make her something special and meaningful.  I kinda surprise her with it and hide it in her backpack the night before the first day.  I “try” not to mention it to her hoping it will be a happy surprise for her.

Anyway, here is my card.

untitled-1150-4

SUPPLIES Stamps: In My Heart (Mama Elephant); Bring on the Sun (Technique Tuesday); KP Come Sail Away (SSS) Dies: In My Heart (Mama Elephant); Landscape Trio (Mama Elephant); Full Card Sunshine (SSS) Color: Black Licorice Hybrid (MFT); Koi Watercolor Pocket Field Sketch Box (Sakura); Salty Ocean, Tumbled Glass, Broken China, Shaded Lilac, Scattered Straw, Wild Honey, Squeezed Lemonade Distress Ink; Versafine Black Onyx (Tsukineko) Other: Wink of Stella Clear (Zig); Patterned Paper (Martha Stewart)

SUPPLIES Stamps: In My Heart (Mama Elephant); Bring on the Sun (Technique Tuesday); KP Come Sail Away (SSS) Dies: In My Heart (Mama Elephant); Landscape Trio (Mama Elephant); Full Card Sunshine (SSS) Color: Black Licorice Hybrid (MFT); Koi Watercolor Pocket Field Sketch Box (Sakura); Salty Ocean, Tumbled Glass, Broken China, Shaded Lilac, Scattered Straw, Wild Honey, Squeezed Lemonade Distress Ink (Ranger); Versafine Black Onyx (Tsukineko) Other: Wink of Stella Clear (Zig); Patterned Paper (Martha Stewart)

Add on:

I just realized I never finished this post!  Goes to show how scatterbrained I can be when I’m multi-tasking.

I wanted to use some stamps and dies that have been untouched (and believe me there are many).  I love Mama Elephant stamps.  The images just make you smile.

I am participating in the current SSS Wednesday Challenge: Use a Stamp

Enjoy!

bam!

Greetings!

My daughter’s birthday was a few weeks ago.  We’ve got a teenager in the house!

I always try to make a fun card for her to include in her presents.  Shaker cards were all the rage last year, that I decided to try it myself.  Quite honestly, I found it more difficult to center it properly.  But I managed to adhere the acetate correctly with the rest of the card!

Here it is:

MSSpiritRally-0035-2

SUPPLIES  Stamps: Super Duo (SSS/ME), It's Your Dies (HA), Kapow (TT) Dies: Crusader Kids (SSS), Stitched Circles (SSS) Color:  Prismacolor Pencils, Seedless Preserves, Chipped Sapphire Distress Ink (Ranger), Black Onyx Versafine (Tsukinkeo), Red Royal Midtone (HA), Black Licorice Hybrid (MFT) Other: Clear Embossing Powder (Ranger), Confetti Glitter (Martha Stewart)

SUPPLIES Stamps: Super Duo (SSS/ME), It’s Your Day (HA), Kapow (TT) Dies: Crusader Kids (SSS), Stitched Circles (SSS) Color: Prismacolor Pencils, Seedless Preserves, Chipped Sapphire Distress Ink (Ranger), Black Onyx Versafine (Tsukinkeo), Red Royal Midtone (HA), Black Licorice Hybrid (MFT) Other: Clear Embossing Powder (Ranger), Confetti Glitter (Martha Stewart)

It was super fun to make.  I love this collaboration set by Simon Says Stamp and Mama Elephant.  The sentiments were both from Technique Tuesday and Hero Arts.  And I just love the stitched die sets from Simon Says Stamp.  The stitching just adds something to the card and I love it!

Until next time!

Love You & Enjoy

For the past few days the Penny Black DT has been showcasing on the blog Valentine’s Day cards and another card of any theme using one of the new stamps from the latest release.   What a great way to show the versatility of the stamps and get some inspiration!

Here are my cards:

Both cards are using the background stamp Bed of Roses.  This is such a lovely stamp and there are so many ways to use it.

My first is a Valentine’s Card used as backdrop to showcase this cute little cat image carrying a cart-full of hearts.

SUPPLIES Stamps (All Penny Black) Bed of Roses; Lots of Love; Gratitude Inks: Tattered Rose Distress Ink (Ranger); Black (Hero Arts) Other: Prismacolor Pencils; Glossy Accents (Ranger); Gems (Michaels): Corner Chomper (WeRMemory Keepers)

SUPPLIES Stamps: (All Penny Black) Bed of Roses; Lots of Love; Gratitude Inks: Tattered Rose Distress Ink (Ranger); Black (Hero Arts) Other: Prismacolor Pencils; Glossy Accents (Ranger); Gems (Michaels): Corner Chomper (WeRMemory Keepers)

Just to add interest and dimension I added glossy accents to the hearst and a few gems to balance off the card.  The sentiment is from this clear set.

My second card is a any occasion card.  I thought I’d make a shaped card this time from one of the few neglected Spellbinders dies that I keep in my stash.  I used both the stamp as a background and cut some of the flowers and leaves from the background as the main focal point.

SUPPLIES Stamps: (All Penny Black) Bed of Roses; Sweet Wishes  Dies:  Classic Scalloped Circles (Spellbinders); Folded Banner (SimonSaysStamp)  Inks:  Memento London Fog (Tsukineko); Weathered Wood Distress Ink (Ranger); Black (Hero Arts) Other:  Prismacolor Pencils; Pearls (Michaels)

SUPPLIES Stamps: (All Penny Black) Bed of Roses; Sweet Wishes Dies: Classic Scalloped Circles (Spellbinders); Folded Banner (SimonSaysStamp) Inks: Memento London Fog (Tsukineko); Weathered Wood Distress Ink (Ranger); Black (Hero Arts) Other: Prismacolor Pencils; Pearls (Michaels)

I left the die on my card base after I ran it through my machine.  I directly stamped the image and then added Distress Ink along the edge of the die.   I decided to use a banner die to include the sentiment from this set.  And to finish the card off I also added a few colored pearls for  dimension.

Thanks for visiting. For more inspiration, please visit the Penny Black blog to view more beauties!

Take care!

Celebrate the Season

Hello!

I decided I’d play along with the Simon Says ,,,,, DIES and/or PUNCHES  where the challenge is to use dies or punches.

I made a Christmas card with this die from Simon and Says Stamp to create a winter scene.

Supplies: Stamps: Good Cheer (Technique Tuesday)   Dies: Mod Tree (SSS), In the Meadow (PTI) Inks: Distress Inks (Ranger), Archival Ink (Ranger) Other: Perfect Pearls Mist Pearl (Ranger), Mister Huey’s Opaque White (Studio Calico), Distress Ink Stain Picket Fence (Ranger), Clear Glitter (Martha Stewart), Star Gem (Hobby Lobby), Dimensional Stickers (Scotch)

The card panel was colored with various shades of blue Distress Inks.  For a snowy effect I flicked onto the panel Picket Fence Distress Stain mixed with a little water.  On 2 separate sheets of white CS, I colored each paper with different shades of green Distress Ink – one being lighter, the other sheet darker.  I die cut 2 trees from each paper.  I sprayed the lighter shaded green trees with Mister Huey’s Opaque White Mist.  The darker colored trees were sprayed with Perfect Pearls Pearl Mist.

I then cut 2 trees from the blue colored card panel.  I carefully pulled these trees off and set them aside for another use.  I then added the lighter colored green trees into that negative space so it would be flush with the panel.

From another piece of white cardstock, I die cut the snow banks from this die set from PTI.  I also added glitter on the edges and added the sentiment on the smaller snowbank.  I adhered one of the darker colored trees onto the blue panel.  I then added the larger snowbank. Next,  I adhered the second darker colored tree onto this snowbank and added a star gem to its top.  I then added the smaller snowbank with dimensional stickers to finish off the panel.  Finally, the panel was adhered to a card base.

Thanks so much for stopping by!

Therese