A Merry Little Christmas

Hi there!

Today I’m sharing a simple Christmas card.

For this card, I created a background on my card base using the smaller images from a Christmas stamp set, MFT’s Birdie Brown’s Santa’s Elves.  With the help of a T-square ruler, I stamped each image with black ink.  I just used 3 colors for the images and then simply added a sentiment on a die cut frame.  The sentiment is from a old Christmas set, Jingle All the Way, designed by Ali Edwards for Technique Tuesday.  It was stamped and heat embossed with white EP.  I added clear sequins to finish off the card.

Until next time!


Shine On

Hello!

Hope you all are off to a great weekend!

Every year I make a card for my daughter at the start of school.  It’s her last year of Middle School (yikes!) and I wanted to make her something special and meaningful.  I kinda surprise her with it and hide it in her backpack the night before the first day.  I “try” not to mention it to her hoping it will be a happy surprise for her.

Anyway, here is my card.

untitled-1150-4

SUPPLIES Stamps: In My Heart (Mama Elephant); Bring on the Sun (Technique Tuesday); KP Come Sail Away (SSS) Dies: In My Heart (Mama Elephant); Landscape Trio (Mama Elephant); Full Card Sunshine (SSS) Color: Black Licorice Hybrid (MFT); Koi Watercolor Pocket Field Sketch Box (Sakura); Salty Ocean, Tumbled Glass, Broken China, Shaded Lilac, Scattered Straw, Wild Honey, Squeezed Lemonade Distress Ink; Versafine Black Onyx (Tsukineko) Other: Wink of Stella Clear (Zig); Patterned Paper (Martha Stewart)

SUPPLIES Stamps: In My Heart (Mama Elephant); Bring on the Sun (Technique Tuesday); KP Come Sail Away (SSS) Dies: In My Heart (Mama Elephant); Landscape Trio (Mama Elephant); Full Card Sunshine (SSS) Color: Black Licorice Hybrid (MFT); Koi Watercolor Pocket Field Sketch Box (Sakura); Salty Ocean, Tumbled Glass, Broken China, Shaded Lilac, Scattered Straw, Wild Honey, Squeezed Lemonade Distress Ink (Ranger); Versafine Black Onyx (Tsukineko) Other: Wink of Stella Clear (Zig); Patterned Paper (Martha Stewart)

Add on:

I just realized I never finished this post!  Goes to show how scatterbrained I can be when I’m multi-tasking.

I wanted to use some stamps and dies that have been untouched (and believe me there are many).  I love Mama Elephant stamps.  The images just make you smile.

I am participating in the current SSS Wednesday Challenge: Use a Stamp

Enjoy!

bam!

Greetings!

My daughter’s birthday was a few weeks ago.  We’ve got a teenager in the house!

I always try to make a fun card for her to include in her presents.  Shaker cards were all the rage last year, that I decided to try it myself.  Quite honestly, I found it more difficult to center it properly.  But I managed to adhere the acetate correctly with the rest of the card!

Here it is:

MSSpiritRally-0035-2

SUPPLIES  Stamps: Super Duo (SSS/ME), It's Your Dies (HA), Kapow (TT) Dies: Crusader Kids (SSS), Stitched Circles (SSS) Color:  Prismacolor Pencils, Seedless Preserves, Chipped Sapphire Distress Ink (Ranger), Black Onyx Versafine (Tsukinkeo), Red Royal Midtone (HA), Black Licorice Hybrid (MFT) Other: Clear Embossing Powder (Ranger), Confetti Glitter (Martha Stewart)

SUPPLIES Stamps: Super Duo (SSS/ME), It’s Your Day (HA), Kapow (TT) Dies: Crusader Kids (SSS), Stitched Circles (SSS) Color: Prismacolor Pencils, Seedless Preserves, Chipped Sapphire Distress Ink (Ranger), Black Onyx Versafine (Tsukinkeo), Red Royal Midtone (HA), Black Licorice Hybrid (MFT) Other: Clear Embossing Powder (Ranger), Confetti Glitter (Martha Stewart)

It was super fun to make.  I love this collaboration set by Simon Says Stamp and Mama Elephant.  The sentiments were both from Technique Tuesday and Hero Arts.  And I just love the stitched die sets from Simon Says Stamp.  The stitching just adds something to the card and I love it!

Until next time!

You Rock!

Hello!

School is OUT!  My kids start their summer vacay with NOTHING to do.  Well, not really.  I’m going to drag them to the gym and have them borrow books from the school library.  This idleness, alas, won’t last.  They’ve got a few camps to go and we will go visit our family.

So, my dear sister graduated nursing school a few weeks ago.  I come from a long line of medical professionals.  My mom and dad are doctors and I have several cousins that are nurses.  This is her second profession after being laid off from her first.  She decided to return to school – go back to college to take required courses and then head to her first choice nursing school.  With unbelievable rigor and determination, she finished – magna cum laude 🙂

So here is my card that I made for her.

untitled-3377

SUPPLIES Stamps First Aid Mimi (PB 4329H); Dude (Technique Tuesday) Dies Hooray (PB 51-0038) Inks Prismacolor Pencils; Color Shine -Sweet Cherry, Primrose, Teal (Heidi Swapp); Versamark Ink (Tsukinkeo) Other Queens Gold DP (Ranger); Wink of Stella Clear (Zig); Glossy Accents (Ranger); Sequins

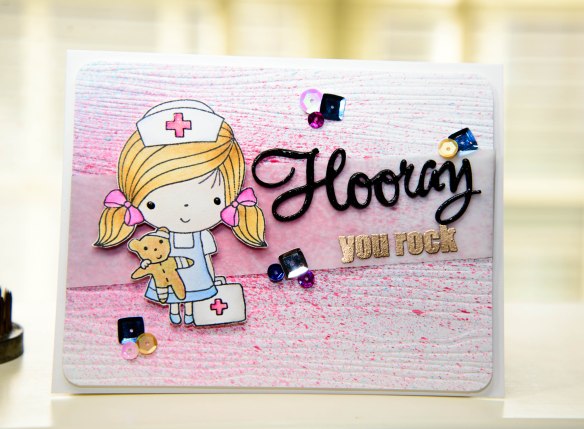
SUPPLIES Stamps First Aid Mimi (PB 4329H); Dude (Technique Tuesday) Dies Hooray (PB 51-0038); Woodgrain Impression Plate (PTI)  Inks Prismacolor Pencils; Color Shine -Sweet Cherry, Primrose, Teal (Heidi Swapp); Versamark Ink (Tsukinkeo); Memento Tuxedo Black Ink (Tsukineko)  Other Queens Gold DP (Ranger); Wink of Stella Clear (Zig); Glossy Accents (Ranger); Sequins; Corner Chomper (We R Memory Keepers)

I thought inking up the very cute image First Aid Mimi (4329H) was perfect for the card.  I stamped the image with black ink, colored her with Prismacolor Pencils and then fussy cut.  I added glossy accents to the pink crosses on the medical bag and her cap.  I set aside.

I impressed a wood grain image on a white CS panel.  I then lightly spritzed hues of pink and red with a light sprinkling of blue ink.  I set that to dry.  On a strip of vellum paper, I heat embossed a appropriate sentiment from Technique Tuesday’s Dude with gold EP.  The strip was adhered on a diagonal to the card panel.  On black CS, I die cut a word from the appropriately named die set Hooray (51-038) several times.  I glued them together to create a more sold image.  As I’ve done in my past cards, I added Wink of Stella and then Glossy Accents to the die cut image.

I then assembled the card.  I added the panel to the card base.  I then adhered my Miimi image and Hooray die cut.  To finish the card off, I added several sequins all over the card.

We had a quiet celebration to celebrate my sister’s achievement.  We are all so happy for her!


Twinkle Twinkle

Here is the next Christmas card I want to share with you.  untitled shoot-1074

SUPPLIES Die: Snowflake Trio (Penny Black 50-015) Stamp Jingle All the Way (Technique Tuesday) Inks Chipped Sapphire, Faded Jeans, Broken China Distress Inks (Ranger); Dylusion London Blue Ink Spray (Ranger); Mistery Huey's Shine (Studio Calico); Mister Huey's Silver (Studio Calico); Perfect Pearls Antique Gold Mists (Ranger); Other Christmas 6x6 Patterned Paper (MME); Clear Glitter Pen (Sakura); Gold Lame Cord

SUPPLIES Die  Snowflake Trio (Penny Black 50-015) Stamp Jingle All the Way (Technique Tuesday) Inks Chipped Sapphire, Faded Jeans, Broken China Distress Inks (Ranger); Dylusion London Blue Ink Spray (Ranger); Mistery Huey’s Shine (Studio Calico); Mister Huey’s Silver (Studio Calico); Perfect Pearls Antique Gold Mists (Ranger); Other Christmas 6×6 Patterned Paper (MME); Clear Glitter Pen (Sakura); Gold Lame Cord

I was working on a separate project using diecut snowflakse when I realized that I could use the negative panel for a card.

I really liked how the panel turned out that I thought it would be great to use it in a different way. I love the luster of the panel.  I first colored the heavy cardstock panel with various hues of Distress Inks (Chipped Sapphire; Faded Blue Jeans and Broken China).  I then spritzed heavily with several types of colored mists.  I added Dylusion London Blue Spray.  Once that was dry, I added Mister’s Huey’s Shine, Mister Huey’s Silver and finally Perfect Pearls Antique Gold mist.  I set that the to dry.  I die cut the two of the snowflakes from Snowflake Trio (50-015) and set them aside for another use.

Behind the negative panel, I added Christmas patterned paper which was also spritzed with Perfect Pearls Antique Gold mist.  I wrapped gold lame cord several times around the panel and added a bow.  The panel was adhered with dimensional adhesive.  The sentiment is from Technique Tuesday.  And for further shine, I used a clear glitter pen to the second “twinkle” of the sentiment.

I am entering this card in the last Festive Friday challenge of the year.  This is the first time I am joining in.  I’ve always wanted to jump in and give it a go but just didn’t get around to doing  it. The final challenge is to pick your favorite challenge of the year.  Since this is my first time, I am going to choose one the many that I wished I entered.   Appropriately, I will choose the Element Challenge: Create a Project Incorporating a Snowflake into Your Design.

Hello

Hi there!

Hope you all had a good weekend.

Today I just wanted to share this bright and happy card with stamps that I have been itching to use.

SUPPLIES:  Stamps:  Embellishments (Penny Black - 30-161); Lovely Mums (Mama Elephant); Happyville - Family (Technique Tuesday) Dies:  Apothecary Labels (Simon Says Stamp) Inks:  Inktense Watercolor Pencils (Derwent); Certainly Celery (Stampin Up); Scattered Straw Distress Ink (Tim Holtz/Ranger); Lettuce Adirondack Dye Ink (Ranger) Other:  Versamark (Tsukineko); Zing White Embossing Ink (American Crafts); Dimensional Foam (3M)

SUPPLIES: Stamps: Embellishments (Penny Black – 30-161); Lovely Mums (Mama Elephant); Happyville – Family (Technique Tuesday) Dies: Apothecary Labels (Simon Says Stamp) Inks: Inktense Watercolor Pencils (Derwent); Certainly Celery (Stampin Up); Scattered Straw Distress Ink (Tim Holtz/Ranger); Lettuce Adirondack Dye Ink (Ranger) Other: Versamark (Tsukineko); Zing White Embossing Ink (American Crafts); Dimensional Foam (3M)

I’ve been wanting to ink these flowers from Mama Elephant’s clear set, Happy Mums, for quite awhile.  I white embossed the flowers in the set and colored with Inktense Watercolor pencils.  The bottom CS panel was stamped repeatedly with the chevron strip from Penny Black’s Embellishments (30 -161).  I also cut a thin strip of green cardstock to act as a border between the panel and the white cardstock.  The sentiment from Technique Tuesday’s Happyville – Family was stamped on a circle die.  I first attached the circle die and then surrounded the circle with the flowers.  The larger flower was adhered with dimensional foam.

It’s been a while that I entered any card challenges. So here I go in entering in this week’s Case this Sketch # 31. I kinda did it a little different by using the mirror image of the sketch.

In addition, I am going to add this to the Cards for Maddy drive.  For more information on sweet Maddy, click here.

Now, also be sure to visit the Penny Black blog.  Penny Black is announcing it’s first official Stamp Squad.  Everyday this week, the blog will announcing all five members.  Today, the blog is profiling Lin.  Love her floral cards!  You can check her card here and visit her blog here.

stamp-squad-announcement


Until next time!


Just a Note

This month’s muse on the Case Study Challenge is Julie Ebersole.  I love her style and her blog.  And, she’s got a great sense of humor.  Of couse I had to play.  Here is her card:

Just so lovely isn’t it!  I love the white emboss on the kraft, the brightness of the flowers and the subtle white stamping in the background.  So, I had to use all these elements on my card.

CSC#131

CSC#131-0071-2

SUPPLIES Stamps: Mosaic (Penny Black); Dots in Space (Penny Black); Glee (Technique Tuesday) Papers: Kraft Paper (PTI); White CS (Neenah); Vellum Paper (Hobby Lobby) Other: Copic Markers; Zing White Emboss (American Crafts); Versamark (Tsukineko); Black Onyx Versafine (Tsukineko); Clear Embossing Powder (Ranger); White Dye Ink (Hero Arts); Vintage Photo Distress Ink (Ranger); Gem (Michaels)


For this card, I white embossed Penny Black’s Mosaic.  I recently purchased my first set of Copics and decided to try my very amateur coloring skills on the flowers.  On a larger square panel, I stamped Penny Black’s Dots in Space with white ink.  Once both panels were stamped and colored, I distressed the edges with Vintage Photo Distress Ink.  I added a sentiment from Technique Tuesday’s Glee on a vellum strip and added a gem to give the card a little more pop.

Hope you all have a great weekend!


Celebrate the Season

Hello!

I decided I’d play along with the Simon Says ,,,,, DIES and/or PUNCHES  where the challenge is to use dies or punches.

I made a Christmas card with this die from Simon and Says Stamp to create a winter scene.

Supplies: Stamps: Good Cheer (Technique Tuesday)   Dies: Mod Tree (SSS), In the Meadow (PTI) Inks: Distress Inks (Ranger), Archival Ink (Ranger) Other: Perfect Pearls Mist Pearl (Ranger), Mister Huey’s Opaque White (Studio Calico), Distress Ink Stain Picket Fence (Ranger), Clear Glitter (Martha Stewart), Star Gem (Hobby Lobby), Dimensional Stickers (Scotch)

The card panel was colored with various shades of blue Distress Inks.  For a snowy effect I flicked onto the panel Picket Fence Distress Stain mixed with a little water.  On 2 separate sheets of white CS, I colored each paper with different shades of green Distress Ink – one being lighter, the other sheet darker.  I die cut 2 trees from each paper.  I sprayed the lighter shaded green trees with Mister Huey’s Opaque White Mist.  The darker colored trees were sprayed with Perfect Pearls Pearl Mist.

I then cut 2 trees from the blue colored card panel.  I carefully pulled these trees off and set them aside for another use.  I then added the lighter colored green trees into that negative space so it would be flush with the panel.

From another piece of white cardstock, I die cut the snow banks from this die set from PTI.  I also added glitter on the edges and added the sentiment on the smaller snowbank.  I adhered one of the darker colored trees onto the blue panel.  I then added the larger snowbank. Next,  I adhered the second darker colored tree onto this snowbank and added a star gem to its top.  I then added the smaller snowbank with dimensional stickers to finish off the panel.  Finally, the panel was adhered to a card base.

Thanks so much for stopping by!

Therese

Boy Birthday Tag

Hello!

One of my son’s friends had a birthday party this weekend.  I decided to create a tag to match the planet wrapping paper I had in my stash. I’ve had this Technique Tuesday set for about a year and I finally decided to use it.  Images were colored with Prisma colored pencils.  The exhaust was stamped with a silver metallic ink.  I didn’t think it sparkled enough so I used the Sakura Stardust clear pen to add more shine.

Stampendous Typewriter Wishes; Flutterfly Friends
Technique Tuesday Out of This World
We R Memory Keepers Corner Chomper Angle/Photo Cut

Until then!

Shine On

Hello.

I decided to attempt a more graphic looking card.  I made a few mistakes along the way, but I think it out nicely in the end.

Hero Arts Starburst Background, Technique Tuesday Bring On The Sun, Mr. Huey’s Shine, Distress Inks

I used this Hero Arts/Studio Calico background image as my focal point.   I directly painted on the stamp with Distress Inks which was then spritzed with water.   I brushed more color on the stamped image if I thought the rays needed a little more intensity.  To add a little more pizzazz, I  sprayed tons of Mr. Huey’s “Shine” on the image.  The “sun” is a combination of Spellbinders Dies as  well as my stash of circle punches.  And to give it just a bit more sparkle, glitter was added as well.  To finish off the card, I used this appropriate Ali Edwards sentiment.

Thanks so much!